Enabling the Unum Integration Widget
- Login to benefitsCONNECT®.
- Click on Company Management.
- Click on Edit Company.
- Select the company by clicking on the name.
- Click on Company Administration.
- Click on Company Information.
- Select the Modules tab.
- Click the Offsite Enrollment checkbox.
Tip!
The Unum Widget is only available for 5 benefits:
- Individual Short-Term Disability
- Whole Life
- Hospital Indemnity
- Group Critical Illness
- Group Accident
To utilize the widget with these benefits you may only select the following benefits from the Benefits tab.
- Click on the Benefits tab
- Select the applicable benefits
- Click Save
- Click on Benefits Plan Administration
- Click on Benefit Providers
- Click Add Benefit Provider
- Under the Enrollment Process drop-down, select Unum Plane.biz Integrated Enrollment
- Proceed to add the Outline of Benefits and Plan Designs for each plan.
- Enter the Unum Case Number as the Policy Number.
Tip!
Only Employees that are Active or on FMLA are eligible to enroll for these Unum plans.
- After you have added your plan designs, click on Company Administration.
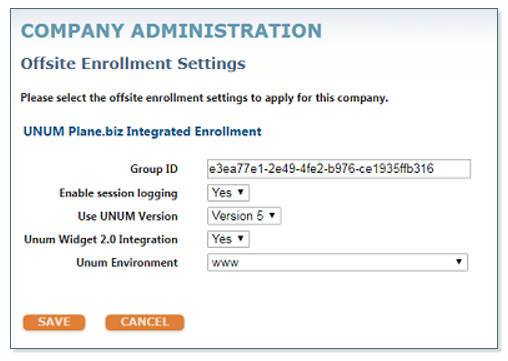
- Click on Offsite Enrollment Settings.
- The Group ID is the GUID ID.
- Use Unum Version 5.
- Unum Widge 2.0 Integration should be set to Yes.
- Unum Environment should be set to www.
- Click Save.
You are now ready to review the widget in bCEnroll.

Tip!
The following employee demographic fields are required to use the Unum widget:
- Home Address
- Home Phone Number
- Current Job Title
- Salary (if using STD)
Updated less than a minute ago
