Creating Smart Forms
- Provide the form that you would like to include in the enrollment process to the designated benefitsCONNECT® representative. The responsible party will map the form fields and upload the document for your use.
- The designated benefitsCONNECT® representative will send you an email letting you know the form is available.
- Upon email receipt login to enroll.benefitsconnect.net

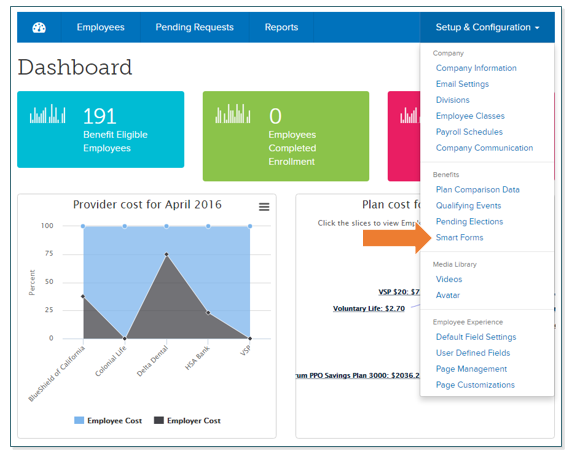
- Click on Setup & Configuration, and from the drop-down menu select Smart Forms.
- Click Smart Forms Library on the Smart Forms page.

- Click Search on the Smart Forms Library page.
- Enter the title of the form or the form number supplied to you and hit Apply.
- Click Clone to copy the smart form to your company.
- Click Back to return to your Company Smart Forms page.
- Click Plans to associate your form with the correct plan.
- Once you’ve clicked on the Plans you will see all the plans that can be added to the form. Click on the checkbox next to the plan you want and click the Edit button.

TIP: You may associate the form to multiple plans and link each plan to a different field.
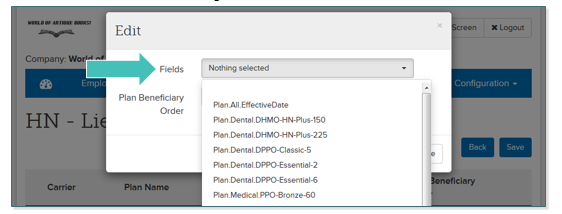
- In the new dialogue box, select the field you want to associate to the plan from the Fields drop down list. This enables the form for use during enrollment.

- Click Save at the top right of the screen to complete the process.
- Upon completion, the form will be accessible via the Benefit Enrollment portal for employees.
TIP: Employees will have the opportunity to sign and view the form at the conclusion of the enrollment process.
- Click Employee Smart Forms on the Company Smart Forms screen and you will have the opportunity to view the form(s) that has/have been completed by each employee. In addition, you may download the forms and print or save them as needed.
Updated less than a minute ago
